Ice cream and gelato temperature alarm settings are just as important as setting the correct freezer temperature.
What truly prevents product loss is correctly setting alarm thresholds, timing delays, and reset deadbands (hysteresis) are configured.
Many operators rely on a single high alarm setting. That approach is too simplistic for commercial freezers subject to door openings, defrost cycles, compressor drift, and overnight failures.
This guide explains how to engineer freezer alarm settings correctly.
Why Single-Level Alarms Are Not Enough
Commercial freezers experience normal temperature variation due to:
- Door openings during service
- Stock rotation
- Automatic defrost cycles
- Ambient temperature changes
- Compressor cycling
- If your system only has one high alarm:
- It may trigger constantly (nuisance alarms)
- Staff may become desensitised
- Or worse — the threshold may be set too high to avoid nuisance alerts, delaying detection of genuine failure
A multi-level alarm system allows early warning and critical alert separation.
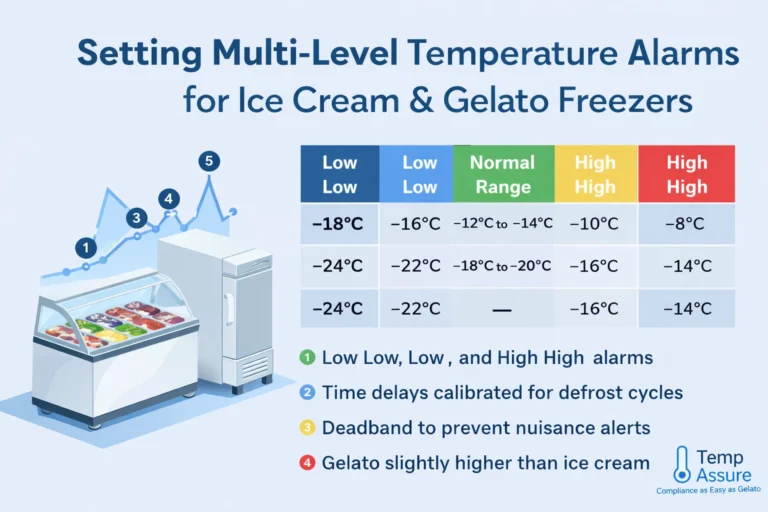
Understanding the Four Levels of Ice Cream and Gelato Temperature Alarm Settings
A properly engineered monitoring system should provide:
- Low Low Alarm
- Low Alarm
- High Alarm
- High High Alarm
With clear visual differentiation:
- Dark Blue – Low Low
- Light Blue – Low
- Green – Normal
- Yellow – High
- Red – High High
This colour-coded structure allows immediate visual interpretation of operational risk.
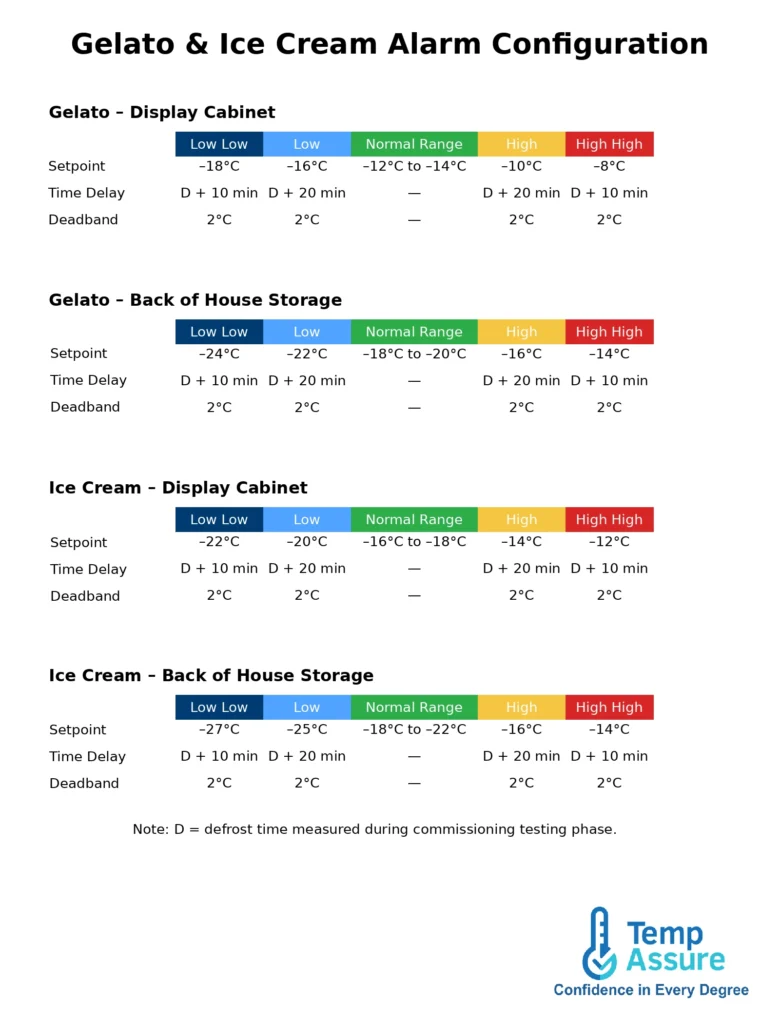
Gelato typically requires slightly lower holding temperatures due to formulation and serving characteristics.
Alarm Delay: How Long Before an Alert Is Sent?
Setting the correct temperature threshold is only half the equation.
You must also determine how long the threshold must be breached before triggering an alert.
If alerts are sent immediately:
- Door openings cause nuisance alarms
- Staff become desensitised
- Important alerts may be ignored
However, delays must also account for defrost cycles.
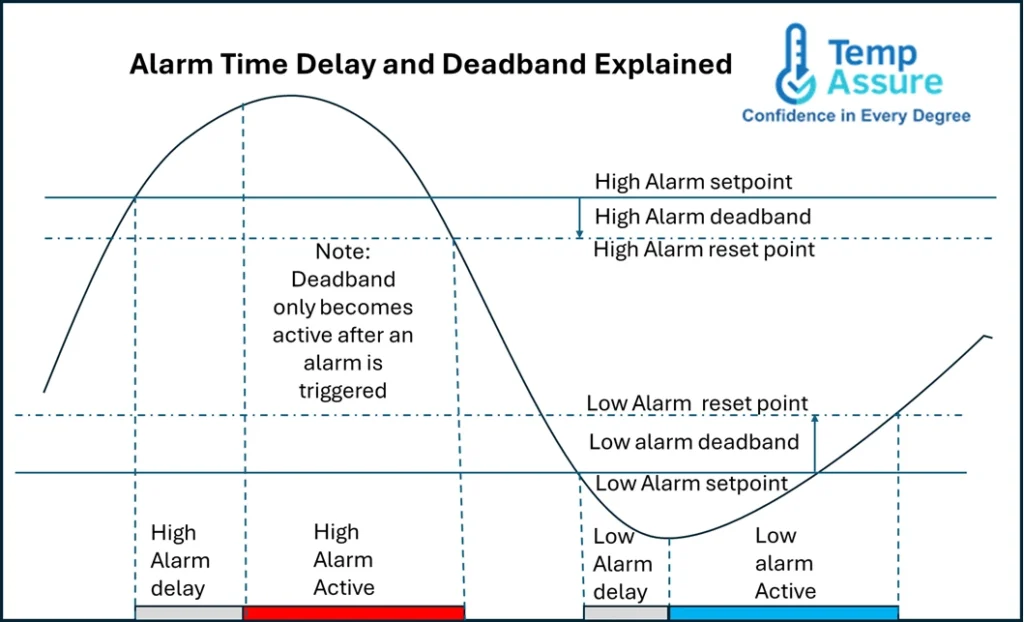
What is Alarm Deadband (Hysteresis)?
Deadband is the setting that determines how far away from the trigger point must the temperature move to allow an automatic reset of the alarm once an alarm has been triggered. In other words, deadband has no effect on the allarm until the alarm has been triggered (Lower that the low setpoint or higher than the high setpoint continuously for the time delay period set for that alarm.
Defrost Cycles Must Be Accounted For
Many commercial freezers use timed or demand-based defrost cycles.
During defrost:
- Evaporator temperature rises
- Cabinet air temperature may temporarily increase
- The temperature may exceed normal operating range
- This can last 20–40 minutes depending on the system
If alarm delay settings are too short, the system will trigger an alert during every scheduled defrost.
This leads to:
- Repeated nuisance alarms
- Staff ignoring alerts
- Alarm fatigue
Alarm timing must therefore be longer than the expected defrost cycle duration.
Determining Defrost Duration Before Setting Alarm Delays
Rather than guessing the correct alarm delay, a better approach is to measure the freezer’s actual defrost behaviour.
This can be done using the monitoring system itself.
Step 1: Temporarily Set Alarm Delay to Zero
- Set High and High High alarms with zero time delay
- Disable SMS and email notifications
- Allow the system to log events without sending alerts
This ensures every temperature excursion during defrost is recorded without disturbing staff.
Step 2: Run for Several Days
Operate normally for 3–5 days.
During this period:
- Defrost cycles will trigger high alarms
- The alarm log will record exact trigger and reset times
- You will see full duration of each defrost event
Because delay is zero, you capture the true excursion window.
Step 3: Calculate Maximum Defrost Duration
From the alarm list, determine:
- Longest recorded high alarm duration
- Typical duration pattern
- Frequency of daily defrost cycles
Example:
If defrost events consistently last 24–27 minutes
and the longest recorded duration is 29 minutes,
You now have real operational data.
Step 4: Set Operational Alarm Delay
Set:
High Alarm Delay = Maximum defrost duration + safety margin
Example:
29-minute maximum defrost + 5-minute buffer = 34-minute high alarm delay
This prevents nuisance alerts while still detecting abnormal behaviour.
Using Dual High Levels for Better Protection
To avoid delaying detection of catastrophic failures:
- Set High Alarm with defrost-aware delay (e.g. 35 minutes)
- Set High High Alarm with shorter delay (e.g. 5–10 minutes)
If temperature rises rapidly beyond normal defrost behaviour, the High High alarm will still activate quickly.
This layered configuration provides both stability and responsiveness.
Deadband (Hysteresis): Preventing Alarm Chatter
Hysteresis defines how far the temperature must return into the safe zone before the alarm resets.
Example:
High Alarm triggered at -15°C
Reset at -16.5°C
This 1.5°C deadband prevents rapid on-off cycling.
Without proper deadband:
- SMS alerts repeat constantly
- Staff confidence declines
- Operational noise increases
Deadband control is critical for professional monitoring systems.
Commissioning Checklist for Freezer Alarm Configuration
Before placing a commercial freezer into full operational monitoring, complete the following commissioning steps:
Initial Setup
☐ Confirm target operating temperature
☐ Set provisional alarm thresholds
☐ Set alarm delay to zero
☐ Disable SMS/email alerts
☐ Confirm logging interval
Defrost Identification
☐ Run system 3–5 days
☐ Review alarm trigger/reset times
☐ Identify defrost cycle pattern
☐ Determine longest defrost duration
Alarm Delay Configuration
☐ Calculate maximum defrost duration
☐ Add safety margin
☐ Set High alarm delay
☐ Set High High shorter delay
☐ Configure Low alarms
Deadband (Hysteresis) Settings
☐ Set 1–2°C reset deadband
☐ Confirm no alarm chatter
☐ Validate reset behaviour
Notification Activation
☐ Re-enable SMS/email alerts
☐ Test alert delivery
☐ Confirm escalation contacts
☐ Document configuration
Final Validation
☐ Simulate controlled temperature excursion if safe
☐ Confirm High High alarm response
☑ Record commissioning date
Why Commissioning Matters
Without commissioning:
- Alarm delays may be too short (nuisance alerts)
- Or too long (delayed detection)
- Staff confidence may decline
- Audit defensibility may weaken
Commissioning ensures monitoring reflects the actual refrigeration behaviour of the site — not a generic assumption.
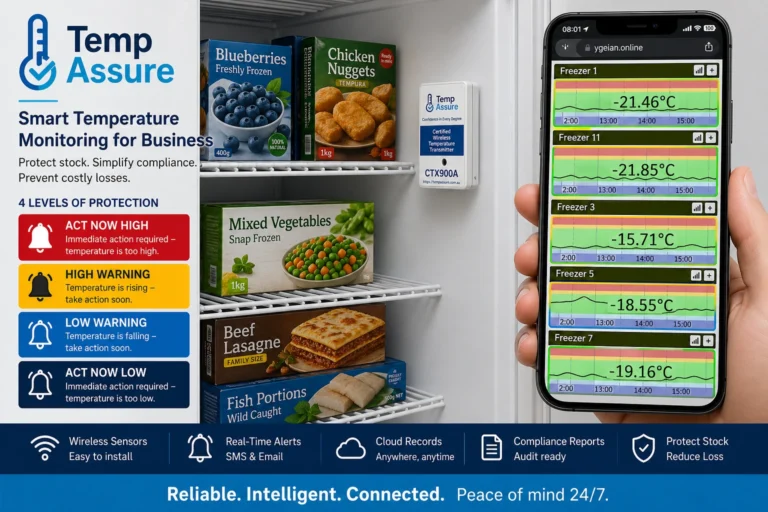
How Temp Assure Enables Professional Alarm Control
Temp Assure monitoring systems provide:
- Four independently configurable alarm thresholds
- Colour-coded status levels
- Adjustable breach delay timing
- Configurable deadband reset points
- Continuous logging for audit readiness
This allows freezer monitoring to be engineered correctly rather than simply measured.
Temp Assure’s continuous temperature monitoring subscription allows independent configuration of High, High-High, Low and Low-Low alarms…
Conclusion
The real question is not only:
“What temperature should my freezer be set to?”
The more important question is:
“When should I be alerted — and at what level of risk?”
Multi-level alarms with defrost-aware delay and proper hysteresis control provide earlier intervention, fewer nuisance alerts, and stronger compliance documentation.
Commercial operators must ensure freezer alarm configuration aligns with food temperature control requirements under the Food Standards Code.
For commercial ice cream and gelato operations, alarm configuration is as important as temperature setpoint.
Configure Alarms Correctly — Without Capital Expenditure
Temp Assure provides fully managed freezer monitoring with configurable multi-level alarms, defrost-aware delay settings, and adjustable deadband control — delivered under a simple subscription model.
→ View monitoring subscription options from 66c per day